
Setting up POPSLoader on PS2 is a useful way to improve your experience when playing PlayStation 1 (PS1) games on a PlayStation 2 console. POPSLoader works as a compatibility tool that lets you switch between different POPS emulator versions, helping you fix issues like black screens, freezing, or audio glitches in certain games.
It is commonly used with Free McBoot (FMCB) and POPStarter to run PS1 ISO files smoothly from USB or HDD. While the setup may seem technical at first, it becomes easy once you follow the correct steps. This guide will help you understand and set it up properly.
Read More: How Do I Download POPSLoader Safely?
What is POPSLoader?
POPSLoader is a plugin used with PS2 homebrew setups that allows you to select different versions of the PS1 emulator (POPS). This helps fix game compatibility issues and improves performance for certain PS1 titles.
It is mainly used with:
- Free McBoot (FMCB)
- OPL (Open PS2 Loader)
- POPStarter (for PS1 ISO loading on PS2)
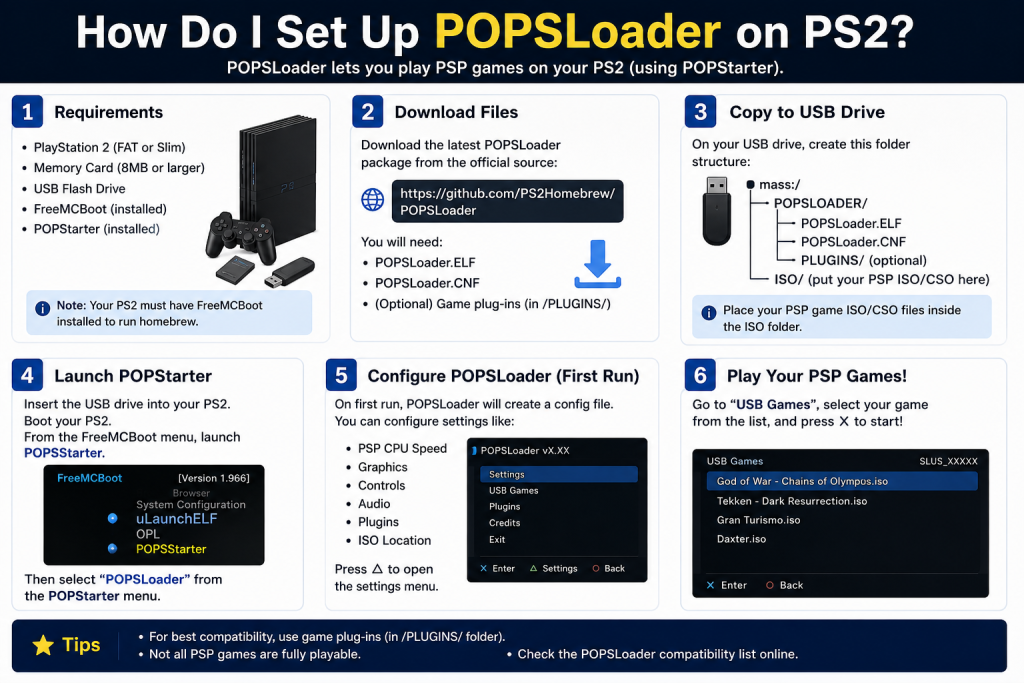
Requirements Before You Start
Before setting up POPSLoader, make sure you have:
- A PS2 console (fat or slim)
- Free McBoot (FMCB) installed on memory card
- USB drive or HDD (depending on setup)
- POPStarter files
- POPSLoader plugin files
- PS1 game backups in ISO format (legally dumped)
Step-by-Step Guide to Set Up POPSLoader on PS2
Step 1: Install Free McBoot (FMCB)
POPSLoader requires FMCB to run homebrew apps.
- Install FMCB on your PS2 memory card
- Boot your PS2 and check if Free McBoot menu appears
Once FMCB is working, you can proceed.
Step 2: Download POPStarter and POPSLoader Files
You need:
- POPStarter ELF files
- POPSLoader plugin pack
- Compatibility lists (optional but helpful)
Extract all files on your PC using WinRAR or 7-Zip.
Step 3: Transfer Files to USB or HDD
Now copy files to your device:
If using USB:
- Create folder:
POPS - Copy POPStarter files inside
If using HDD:
- Place files in the correct
+OPLorPOPSdirectory depending on setup
Make sure file structure is clean and organized.
Step 4: Install POPSLoader in FMCB
- Plug memory card into PS2
- Copy POPSLoader folder to:
mass:/ or mc0:/BOOT/- Edit FMCB config if needed to add POPSLoader shortcut
Now POPSLoader will appear in your PS2 homebrew menu.
Step 5: Configure POPSLoader
Launch POPSLoader from FMCB menu:
- Select your PS1 game
- Choose POPS version (different emulator versions)
- Try different versions if a game doesn’t run properly
This is the main advantage of POPSLoader—flexibility.
Step 6: Run PS1 Games via POPStarter
To play games:
- Start POPStarter ELF
- Select your PS1 ISO
- POPSLoader will automatically choose or ask for POPS version
- Launch the game
If the game crashes or glitches, try another POPS version.
Tips for Better Performance
- Use USB 2.0 or internal HDD (best option)
- Avoid corrupted ISO files
- Try different POPS versions for compatibility
- Keep FMCB updated
Common Issues & Fixes
Game not loading
Try a different POPS version in POPSLoader.
Black screen
Check ISO format and file location.
Slow performance
Use HDD instead of USB.
Conclusion
Setting up POPSLoader on PS2 is a great way to enhance your retro gaming experience, especially if you enjoy playing classic PS1 titles. Although the setup process involves a few technical steps, it becomes simple once you understand how Free McBoot, POPStarter, and POPSLoader work together. The biggest advantage of POPSLoader is its ability to switch between different emulator versions, helping you fix compatibility issues and improve game performance. With the right setup and a properly configured system, you can enjoy smooth and stable gameplay on your PS2. It’s a powerful solution for keeping classic games alive and playable.